My talk is "Flapping Birds and Space Telescopes." And you would think that should have nothing to do with one another, but I hope by the end of these 18 minutes, you'll see a little bit of a relation. It ties to origami. So let me start. What is origami? Most people think they know what origami is. It's this: flapping birds, toys, cootie catchers, that sort of thing. And that is what origami used to be. But it's become something else. It's become an art form, a form of sculpture.
저는 "종이학과 우주 망원경"에 대해 말씀 드리려 합니다. 지금은 이 두 가지가 서로 아무 상관이 없다고 생각하시겠지만 18분 후 강연이 끝날 때 쯤에는 약간의 연관성을 보시게 될 겁니다. 그 접점은 종이접기입니다. 시작하지요. 종이접기란 뭘까요? 대부분의 사람들은 종이접기를 안다고 생각합니다. 종이학, 장난감, 동서남북 같은 것으로 알고 있지요. 과거의 종이접기는 그랬습니다. 하지만, 이젠 전혀 다른 것으로 거듭났습니다. 조형미술의 한 형태가 되었죠.
The common theme -- what makes it origami -- is folding is how we create the form. You know, it's very old. This is a plate from 1797. It shows these women playing with these toys. If you look close, it's this shape, called a crane. Every Japanese kid learns how to fold that crane. So this art has been around for hundreds of years, and you would think something that's been around that long -- so restrictive, folding only -- everything that could be done has been done a long time ago. And that might have been the case.
종이접기는 접기와 형태를 만드는 방법으로 이루어집니다. 종이접기의 역사는 깁니다. 여기 1797년에 그려진 그림을 보면 여성들이 장난감을 가지고 노는데요. 자세히 보면 종이학인 것을 알 수 있습니다. 일본의 어린이들은 모두 종이학 접는 법을 배웁니다. 이 기술은 벌써 수백 년이나 된 것이죠. 아마도 여러분은 접기만 하는 이렇게 단순한 기술이 그리 오래되었다면 할 수 있는 일은 이미 다 해봤을 거라고 생각하실 겁니다. 한때는 사실이기도 했을 것이구요.
But in the twentieth century, a Japanese folder named Yoshizawa came along, and he created tens of thousands of new designs. But even more importantly, he created a language, a way we could communicate, a code of dots, dashes and arrows. Harkening back to Susan Blackmore's talk, we now have a means of transmitting information with heredity and selection, and we know where that leads. And where it has led in origami is to things like this. This is an origami figure -- one sheet, no cuts, folding only, hundreds of folds. This, too, is origami, and this shows where we've gone in the modern world. Naturalism. Detail. You can get horns, antlers -- even, if you look close, cloven hooves.
하지만, 20세기에 요시자와라는 일본의 종이접기 장인이 나타나 수만 가지의 새로운 디자인을 창조해냈습니다. 그러나, 더 중요한 사실은 그가 점선, 실선과 화살표로 이루어진 종이접기의 언어를 만들었다는 것입니다. 수잔 블랙모어의 말을 빌리자면, 우리는 세습과 선택을 통해 정보를 전달할 수 있는 수단을 가지게 된 것이죠. 이로 인해 어떤 결과가 나올지 아시겠죠? 그 덕분에 종이접기로 이런 것들이 가능해졌습니다. 이것은 종이접기 작품입니다. 한 장의 종이를 자르지 않고 수백 번 접기만 한 작품이죠. 이것도 종이접기 작품인데 현대 종이접기의 정점을 보여줍니다. 자연주의와 세부 묘사. 다양한 뿔을 나타낼 수 있고 자세히 보면 갈라진 발굽도 볼 수 있습니다.
And it raises a question: what changed? And what changed is something you might not have expected in an art, which is math. That is, people applied mathematical principles to the art, to discover the underlying laws. And that leads to a very powerful tool. The secret to productivity in so many fields -- and in origami -- is letting dead people do your work for you.
이제 궁금해지시겠죠. 무엇이 달라진걸까? 달라진 것은 일반적으로는 예술에서 기대하지 않았던 그것입니다. 바로 수학이죠. 즉, 사람들이 수학 이론을 예술에 적용시켜 숨겨진 규칙을 발견하는 겁니다. 덕분에 수학은 아주 강력한 도구가 되었습니다. 종이접기를 비롯한 여러 분야에서 생산성의 비법은 조상님들이 여러분 대신 일하게 하는 것입니다.
(Laughter)
(웃음)
Because what you can do is take your problem, and turn it into a problem that someone else has solved, and use their solutions. And I want to tell you how we did that in origami. Origami revolves around crease patterns. The crease pattern shown here is the underlying blueprint for an origami figure. And you can't just draw them arbitrarily. They have to obey four simple laws. And they're very simple, easy to understand. The first law is two-colorability. You can color any crease pattern with just two colors without ever having the same color meeting. The directions of the folds at any vertex -- the number of mountain folds, the number of valley folds -- always differs by two. Two more or two less. Nothing else. If you look at the angles around the fold, you find that if you number the angles in a circle, all the even-numbered angles add up to a straight line, all the odd-numbered angles add up to a straight line. And if you look at how the layers stack, you'll find that no matter how you stack folds and sheets, a sheet can never penetrate a fold. So that's four simple laws. That's all you need in origami. All of origami comes from that.
여러분이 할 일은 여러분의 문제를 예전에 누가 해결했던 문제로 변환하여 그들의 해답을 사용하는 것입니다. 이 과정이 종이접기에도 적용된다는 걸 보여드리겠습니다. 종이접기는 접기 패턴이 중심입니다. 지금 보시는 접기 패턴은 어떤 종이접기 작품을 위한 청사진입니다. 청사진은 임의로 그릴 수 없습니다. 반드시 네 개의 단순한 법칙을 따라야하는데 아주 단순하며 이해하기도 쉽습니다. 첫번째 법칙은 두 가지 색상만 사용해야 하는 것입니다. 접기 패턴은 두 가지 색상만 사용하여 같은 색상이 이웃하지 않도록 만듭니다. 어느 꼭짓점에서든 접는 방향의 횟수-- 그러니까 산접기와 계곡접기 횟수의 차는 항상 2입니다. 두 번 더, 또는 두 번 덜 접죠. 예외는 없습니다. 접은 모서리의 각을 살펴볼 때 원 내부 각에 돌아가며 숫자를 매겨보면 모든 짝수 각의 합은 180도가 되고 모든 홀수 각의 합도 180도가 되는 것을 알 수 있습니다. 그리고 층이 쌓이는 규칙을 보면 종이와 접힌 종이를 어떤 방식으로 쌓아도 종이는 절대로 접힌 부분을 통과할 수 없습니다. 이상이 종이접기의 단순한 법칙 네 가지입니다. 모든 종이접기는 거기서부터 시작합니다.
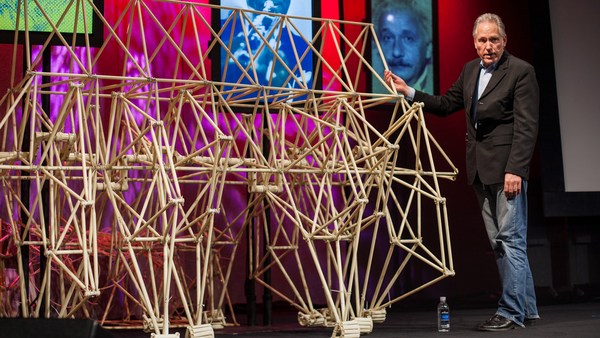
And you'd think, "Can four simple laws give rise to that kind of complexity?" But indeed, the laws of quantum mechanics can be written down on a napkin, and yet they govern all of chemistry, all of life, all of history. If we obey these laws, we can do amazing things. So in origami, to obey these laws, we can take simple patterns -- like this repeating pattern of folds, called textures -- and by itself it's nothing. But if we follow the laws of origami, we can put these patterns into another fold that itself might be something very, very simple, but when we put it together, we get something a little different. This fish, 400 scales -- again, it is one uncut square, only folding. And if you don't want to fold 400 scales, you can back off and just do a few things, and add plates to the back of a turtle, or toes. Or you can ramp up and go up to 50 stars on a flag, with 13 stripes. And if you want to go really crazy, 1,000 scales on a rattlesnake. And this guy's on display downstairs, so take a look if you get a chance.
"4개의 간단한 법칙으로 그렇게 복잡한 것을 만들 수 있나?"라는 생각이 들겠죠. 하지만 사실입니다. 양자 역학의 법칙도 냅킨 하나에 다 쓸 수 있습니다. 양자역학이 모든 화학과 모든 생명, 모든 역사를 지배하는데도 말이죠. 이 규칙들을 따르면 우리는 놀라운 일을 해낼 수 있습니다. 우리는 종이접기를 할 때 규칙을 따르기 위해 이것과 같이 접기 패턴이 반복되는 텍스쳐라 불리는 단순한 패턴에서 시작합니다. 이것만으로는 아무것도 아니죠. 하지만 종이접기의 법칙을 따르면 하나의 매우 단순한 패턴이라도 조금 다르게 응용시키면 전혀 다른 새로운 작품이 탄생합니다. 전혀 다른 새로운 작품이 탄생합니다. 이 물고기는 400개의 비늘이 있습니다. 이것 역시 자르지 않고 접기만 한 종이 한 장이지요. 비늘을 400개 접기 싫다면, 조금 덜 복잡한 거북이 등껍질이나 발가락을 만들어도 됩니다. 더 복잡한 걸 원하면, 50개의 별과 13개의 줄로 이뤄진 깃발을 만들어도 되고요. 정말 미치고 싶다면 방울뱀의 비늘 1000개도 도전해보세요. 이 녀석은 아랫층에 전시되어있으니 시간이 된다면 구경해보세요.
The most powerful tools in origami have related to how we get parts of creatures. And I can put it in this simple equation. We take an idea, combine it with a square, and you get an origami figure.
종이접기의 가장 강력한 도구는 생물의 일부를 어떻게 구하느냐와 연관되는데 이를 간단한 공식으로 표현해봤습니다. 우리의 아이디어를 종이와 합치면 종이접기 작품이 탄생하죠.
(Laughter)
(웃음)
What matters is what we mean by those symbols. And you might say, "Can you really be that specific? I mean, a stag beetle -- it's got two points for jaws, it's got antennae. Can you be that specific in the detail?" And yeah, you really can. So how do we do that? Well, we break it down into a few smaller steps. So let me stretch out that equation. I start with my idea. I abstract it. What's the most abstract form? It's a stick figure. And from that stick figure, I somehow have to get to a folded shape that has a part for every bit of the subject, a flap for every leg. And then once I have that folded shape that we call the base, you can make the legs narrower, you can bend them, you can turn it into the finished shape.
중요한 것은 이 기호가 의미하는 바입니다. 어떤 분들은 묻겠죠, "그렇게 자세하게 표현이 가능한가요?" 그러니까, 사슴 벌레에게 두 개의 턱과 더듬이가 있다면, 그렇게 세세하게 표현할 수 있나요?" 물론 가능합니다. 어떻게 하면 될까요? 우리는 일단 이것을 여러 단계로 나눕니다. 앞의 공식을 조금 전개해보겠습니다. 제 아이디어를 추상화하는 것부터 시작하죠. 가장 추상적인 형태가 뭘까요? 바로 선입니다. 그 선형에서부터 대상의 모든 부분을 표현하는 접힌 형태들을 어떻게든 만들어내야 하죠. 다리를 표현할 플랩까지요. 그리고 베이스라 불리는 기본 형태를 갖추게 되면 다리를 가늘게 하거나 굽혀서 완성된 형태를 만들 수 있습니다.
Now the first step, pretty easy. Take an idea, draw a stick figure. The last step is not so hard, but that middle step -- going from the abstract description to the folded shape -- that's hard. But that's the place where the mathematical ideas can get us over the hump. And I'm going to show you all how to do that so you can go out of here and fold something. But we're going to start small. This base has a lot of flaps in it. We're going to learn how to make one flap. How would you make a single flap? Take a square. Fold it in half, fold it in half, fold it again, until it gets long and narrow, and then we'll say at the end of that, that's a flap. I could use that for a leg, an arm, anything like that.
이게 첫 단계입니다. 아주 쉽죠. 아이디어를 떠올리고, 선을 그린다. 마지막 단계도 그렇게 어렵지는 않지만 추상적인 선 모형을 접힌 형태로 만드는 중간 과정, 그 과정이 힘듭니다. 바로 그 난감한 과정에서 수학 이론이 빛을 발휘합니다. 제가 그 과정을 보여드리면 여러분도 작품을 만들 수 있을 겁니다. 작은 것에서부터 시작하죠. 이 베이스는 플랩이 많습니다. 플랩 하나를 만드는 법을 배워봅시다. 하나의 플랩을 어떻게 만드냐면 정사각형 종이가 길고 가늘어질 때까지 반으로 접고 접고 또 접는 겁니다. 이렇게 다 접으시면 플랩이 완성되었죠. 이 플랩을 다리, 팔 등으로 사용할 수 있습니다.
What paper went into that flap? Well, if I unfold it and go back to the crease pattern, you can see that the upper left corner of that shape is the paper that went into the flap. So that's the flap, and all the rest of the paper's left over. I can use it for something else. Well, there are other ways of making a flap. There are other dimensions for flaps. If I make the flaps skinnier, I can use a bit less paper. If I make the flap as skinny as possible, I get to the limit of the minimum amount of paper needed. And you can see there, it needs a quarter-circle of paper to make a flap. There's other ways of making flaps. If I put the flap on the edge, it uses a half circle of paper. And if I make the flap from the middle, it uses a full circle. So, no matter how I make a flap, it needs some part of a circular region of paper. So now we're ready to scale up. What if I want to make something that has a lot of flaps? What do I need? I need a lot of circles.
플랩은 종이의 어느 부분을 사용할까요? 자, 접은 것을 펼쳐서 접기 패턴을 보면 왼쪽 위 모서리 부분이 플랩으로 사용된 걸 알 수 있습니다. 왼쪽 위 모서리 부분이 플랩으로 사용된 걸 알 수 있습니다. 그 도형이 플랩이고 그 나머지는 여분 종이입니다. 그 여분을 다른 곳에 쓸 수 있죠. 다른 방법으로도 플랩을 만들 수 있습니다. 규모도 달리할 수 있고요. 플랩을 가늘게 만들수록 필요한 부분도 적죠. 플랩을 최대한 가늘게 만들게 되면 필요한 종이 넓이의 최소 한계에 이릅니다. 보시다시피 플랩에 원의 ¼이 들어가죠. 이외에도 플랩 만드는 법은 여러가지입니다. 종이의 가장자리에 플랩을 만들면 반원이 필요하고 종이 내부에 만들면 온전한 원이 필요합니다. 그래서 플랩을 만들게 되면 어떠한 방식을 사용해도 원의 일부가 필요합니다. 이제 한 단계 올라서서 플랩이 많은 형태를 만들려면 어떻게 해야할까요? 그렇습니다. 원이 많이 필요하겠죠.
And in the 1990s, origami artists discovered these principles and realized we could make arbitrarily complicated figures just by packing circles. And here's where the dead people start to help us out, because lots of people have studied the problem of packing circles. I can rely on that vast history of mathematicians and artists looking at disc packings and arrangements. And I can use those patterns now to create origami shapes. So we figured out these rules whereby you pack circles, you decorate the patterns of circles with lines according to more rules. That gives you the folds. Those folds fold into a base. You shape the base. You get a folded shape -- in this case, a cockroach. And it's so simple.
종이접기 장인들은 이 법칙을 1990년대에 발견하고서 종이 한 장에 원을 많이 채워넣는 것만으로 임의적으로 복잡한 형태를 만들 수 있단 걸 깨달았죠. 여기서 조상님들이 우리를 도와주기 시작합니다. 왜냐하면 종이에 원을 채워넣는 문제는 많은 사람들이 연구했으니까요. 역사 속 수많은 수학자들과 예술가들이 공부했던 원의 배열에 관한 지식을 쓸 수 있죠. 그리고 그 패턴으로 종이접기 형태를 만드는 겁니다. 이러한 원 배열 법칙을 따르고 또 다른 법칙을 써서 원에 선을 그려넣으면 접기패턴이 나옵니다. 선을 따라 접으면 베이스가 나오고, 베이스를 다듬어 형태를 만들죠. 이건 바퀴벌레입니다. 참 쉽죠?
(Laughter)
(웃음)
It's so simple that a computer could do it. And you say, "Well, you know, how simple is that?" But computers -- you need to be able to describe things in very basic terms, and with this, we could. So I wrote a computer program a bunch of years ago called TreeMaker, and you can download it from my website. It's free. It runs on all the major platforms -- even Windows.
너무 쉬워서 컴퓨터로도 할 수 있습니다. "그게 과연 쉬운가요?" 라고 하셔도 컴퓨터는 근본적인 원리만 받아들이니 종이접기는 간단한 원리로 표현이 된다는 거죠. 그래서 몇 년 전에 제가 트리메이커라는 프로그램을 만들었습니다. 제 사이트에서 공짜로 받을 수 있습니다. 웬만한 운영체제에서 실행 가능하죠.
(Laughter)
윈도우에서도요. (웃음)
And you just draw a stick figure, and it calculates the crease pattern. It does the circle packing, calculates the crease pattern, and if you use that stick figure that I just showed -- which you can kind of tell, it's a deer, it's got antlers -- you'll get this crease pattern. And if you take this crease pattern, you fold on the dotted lines, you'll get a base that you can then shape into a deer, with exactly the crease pattern that you wanted. And if you want a different deer, not a white-tailed deer, but you want a mule deer, or an elk, you change the packing, and you can do an elk. Or you could do a moose. Or, really, any other kind of deer. These techniques revolutionized this art. We found we could do insects, spiders, which are close, things with legs, things with legs and wings, things with legs and antennae. And if folding a single praying mantis from a single uncut square wasn't interesting enough, then you could do two praying mantises from a single uncut square. She's eating him. I call it "Snack Time."
여러분이 선 모형만 그리면 프로그램이 접기패턴을 계산해줍니다. 원 배열을 이용해서 패턴을 만들죠. 제가 방금 보여드린 선 모형을 예로, 뿔 달린 사슴이란 걸 아마 눈치채셨겠지만, 이런 접기 패턴이 나옵니다. 선을 따라서 이 패턴을 접으시면 베이스 모양이 나오는데요, 이 것을 자세한 접기 패턴을 사용하여 원하시는 사슴 모양을 만드시면 됩니다. 그리고 흰 꼬리 사슴이 아닌 다른 사슴을 원한다면 원 배열을 바꾸면 됩니다. 엘크도 만들 수 있습니다. 아니면 무스도 되죠. 사실 어떤 사슴 종류도 가능합니다. 이런 기술은 종이접기 분야를 크게 바꿨죠. 곤충도 접을 수 있게 되었고 거미도 만들 수 있고 다리, 날개 그리고 더듬이가 달린 것까지 표현할 수 있습니다. 종이 한 장으로 사마귀 한 마리를 접는 것이 별로 재미없다고 여기시면 종이 한 장으로 사마귀 두 마리를 만들 수도 있습니다. 암컷이 수컷을 먹고 있네요. 제목을 "간식시간"이라고 지어주죠.
And you can do more than just insects. This -- you can put details, toes and claws. A grizzly bear has claws. This tree frog has toes. Actually, lots of people in origami now put toes into their models. Toes have become an origami meme, because everyone's doing it. You can make multiple subjects. So these are a couple of instrumentalists. The guitar player from a single square, the bass player from a single square. And if you say, "Well, but the guitar, bass -- that's not so hot. Do a little more complicated instrument." Well, then you could do an organ.
곤충 외에도 가능성은 무한합니다. 세세한 사항까지 들어가 곰의 발가락과 발톱까지도 표현할 수 있죠. 청개구리의 발가락도요. 이제 많은 사람들이 종이접기하면서 발가락도 표현합니다. 발가락은 종이접기의 밈이 된거죠. (밈=비유전적 문화요소) 모두가 그렇게 하니까요. 복수 개체도 만들 수 있습니다. 이것은 두 명의 악기 연주자입니다. 종이 한 장으로는 기타 연주자를 또 다른 한 장으로는 베이스 연주자를 만들었습니다. 하지만 기타나 베이스만으로 멋지단 생각이 안 든다면 더 복잡한 악기를 만들어볼까요? 음, 그러면 오르간을 만들죠 뭐.
(Laughter)
(웃음)
And what this has allowed is the creation of origami-on-demand. So now people can say, "I want exactly this and this and this," and you can go out and fold it. And sometimes you create high art, and sometimes you pay the bills by doing some commercial work. But I want to show you some examples. Everything you'll see here, except the car, is origami.
이렇게 해서 탄생한 것이 주문형 종이접기 입니다. 사람들이 이러이러한 것이 필요하다고 말하면 종이접기로 만들어주는거죠. 순수예술 작품을 만들기도 하고 가끔은 상업예술로 돈도 법니다. 몇 가지 예를 보여드릴게요. 다음 동영상에서 차를 제외한 모든 것들은 종이접기 작품들입니다.
(Video)
(동영상)
(Applause)
(박수)
Just to show you, this really was folded paper. Computers made things move, but these were all real, folded objects that we made. And we can use this not just for visuals, but it turns out to be useful even in the real world. Surprisingly, origami and the structures that we've developed in origami turn out to have applications in medicine, in science, in space, in the body, consumer electronics and more.
보시다시피 이들은 실제 종이 작품들입니다. 컴퓨터로 움직임을 표현했지만 이들은 모두 우리가 만든 종이접기 작품들입니다. 우리는 종이접기를 예술적 가치만이 아니라, 실제 세계에서 유용하게 쓰이게도 합니다. 놀랍게도 종이접기와 우리가 종이접기에서 개발한 구조들은 의학과 과학, 우주에서, 인체에서, 그리고 가전제품 등에도 응용이 가능합니다.
And I want to show you some of these examples. One of the earliest was this pattern, this folded pattern, studied by Koryo Miura, a Japanese engineer. He studied a folding pattern, and realized this could fold down into an extremely compact package that had a very simple opening and closing structure. And he used it to design this solar array. It's an artist's rendition, but it flew in a Japanese telescope in 1995. Now, there is actually a little origami in the James Webb Space Telescope, but it's very simple. The telescope, going up in space, it unfolds in two places. It folds in thirds. It's a very simple pattern -- you wouldn't even call that origami. They certainly didn't need to talk to origami artists.
이에 대한 예를 몇 가지 보여드리겠습니다. 이것은 초기 패턴 중 하나입니다. 이 접기 패턴은 일본의 기술자인 코료 미우라가 연구한 것입니다. 그는 접는 패턴을 연구하다가 아주 쉽게 여닫을 수 있는 구조를 가진 극히 작은 꾸러미를 만들 수 있단 걸 깨닫고 지금 보시는 태양열 집열기 설계에 사용했습니다. 이건 모형이지만, 실제 제품은 1995년에 발사된 일본 망원경에 포함되어 있었습니다. 사실 제임스 웹 우주 망원경에도 종이접기가 조금 관련되어 있습니다. 매우 간단하지만요. 우주로 발사된 망원경의 양쪽에서 날개가 펼쳐집니다. 삼등분으로 접혀있었던거죠. 너무 간단해서 종이접기랄 것도 없습니다. 종이접기 예술가들과 상담할 필요도 없었습니다.
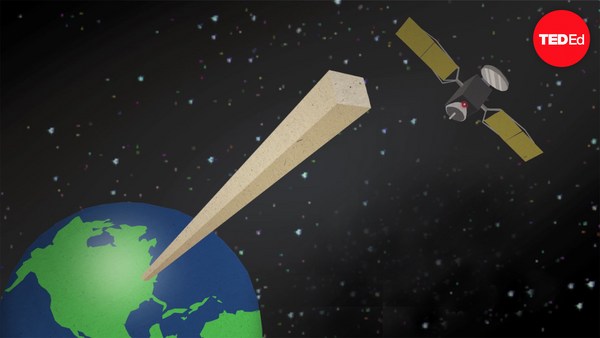
But if you want to go higher and go larger than this, then you might need some origami. Engineers at Lawrence Livermore National Lab had an idea for a telescope much larger. They called it the Eyeglass. The design called for geosynchronous orbit 25,000 miles up, 100-meter diameter lens. So, imagine a lens the size of a football field. There were two groups of people who were interested in this: planetary scientists, who want to look up, and then other people, who wanted to look down. Whether you look up or look down, how do you get it up in space? You've got to get it up there in a rocket. And rockets are small. So you have to make it smaller. How do you make a large sheet of glass smaller? Well, about the only way is to fold it up somehow. So you have to do something like this. This was a small model.
하지만 이보다 더 멀리 나아가는 큰 망원경이 필요하면 종이접기 기술이 필요할겁니다. 로렌스 리버모어 국립연구소의 기술자들은 훨씬 더 큰 망원경을 만들고자 했습니다. 그들은 그것을 "Eyeglass"라 불렀죠. 이것의 설계에는 42,000 킬로미터 상공의 지구 동기 궤도와 지름 100미터의 렌즈가 필요했습니다. 축구장 크기만한 렌즈를 떠올리시면 됩니다. 이에 흥미를 보인 사람들은 두 부류였습니다. 우주를 올려다보고 싶은 행성학자들와 지구를 내려다보고 싶은 사람들이었죠. 위를 보든 아래를 보든 망원경을 우주로 보내려면 로켓에 실어야 합니다. 그리고 로켓은 작으므로, 망원경도 작게 만들어야 합니다. 이 거대한 유리판을 어떻게 축소시킬까요? 어떻게든 접어내야 하는게 정답이겠죠. 바로 이렇게 말입니다. 이것은 축소판 모형입니다.
Folded lens, you divide up the panels, you add flexures. But this pattern's not going to work to get something 100 meters down to a few meters. So the Livermore engineers, wanting to make use of the work of dead people, or perhaps live origamists, said, "Let's see if someone else is doing this sort of thing." So they looked into the origami community, we got in touch with them, and I started working with them. And we developed a pattern together that scales to arbitrarily large size, but that allows any flat ring or disc to fold down into a very neat, compact cylinder. And they adopted that for their first generation, which was not 100 meters -- it was a five-meter. But this is a five-meter telescope -- has about a quarter-mile focal length. And it works perfectly on its test range, and it indeed folds up into a neat little bundle.
렌즈를 여러 개로 나눠 굴곡을 더합니다. 하지만 이 방식만으로 100미터 크기의 물건을 수 미터 이내로 줄일 수는 없습니다. 그래서 리버모어의 기술자들은 선조 혹은 현대의 종이접기 장인들의 작품을 이용하고자 했습니다. "이런 일을 할 수 있는 사람을 찾아야겠어" 그들은 종이접기 커뮤니티를 살폈고, 그러다 우리와 연락이 되어 제가 그들과 협업하게 됐습니다. 우리는 접기 패턴을 개발했는데, 아주 큰 크기에도 적용할 수 있었으며, 납작한 원 모양이든 반지 모양이든 상관없이 아주 작은 원기둥 모양으로 깔끔하게 접을 수 있었습니다. 1세대 시험용 망원경 렌즈는 100미터가 아닌 5미터로 시작했죠. 하지만 이 5미터 망원경의 초점거리는 400미터나 됩니다. 시험 비행에서도 잘 작동했고 역시나 작은 꾸러미로 깔끔하게 접힙니다.
Now, there is other origami in space. Japan Aerospace [Exploration] Agency flew a solar sail, and you can see here that the sail expands out, and you can still see the fold lines. The problem that's being solved here is something that needs to be big and sheet-like at its destination, but needs to be small for the journey. And that works whether you're going into space, or whether you're just going into a body. And this example is the latter. This is a heart stent developed by Zhong You at Oxford University. It holds open a blocked artery when it gets to its destination, but it needs to be much smaller for the trip there, through your blood vessels. And this stent folds down using an origami pattern, based on a model called the water bomb base.
우주에 다른 종이접기 작품도 있습니다. 일본 우주항공연구개발기구에서 태양돛을 올려보냈는데 여기 보시면 펼쳐진 돛을 볼 수 있습니다. 접히는 부분이 생생하게 보이죠. 여기서 우리가 해결해야 했던 문제는 운반할 때 작지만 목적지에서는 큰 종이 한 장으로 펼쳐질 물건을 만들어야 했던 겁니다. 이 기술은 우주에서도 유용하지만 인체에서도 매우 유용합니다. 다음은 후자의 예입니다. 옥스퍼드 대학의 정 유가 개발한 심장 스텐트입니다. 목적지에서 펼쳐져 폐색동맥을 지탱해야 하는데, 혈관을 통과해서 도착하기 이전에는 훨씬 작은 크기여야 합니다. 이 스텐트는 물풍선 모형을 베이스로 한 종이접기 패턴을 이용하여 접힙니다.
Airbag designers also have the problem of getting flat sheets into a small space. And they want to do their design by simulation. So they need to figure out how, in a computer, to flatten an airbag. And the algorithms that we developed to do insects turned out to be the solution for airbags to do their simulation. And so they can do a simulation like this. Those are the origami creases forming, and now you can see the airbag inflate and find out, does it work? And that leads to a really interesting idea.
에어백 설계자들도 에어백을 작은 공간에 어떻게 접어넣어야할지 고민합니다. 시뮬레이션을 하기 위해 그들은 컴퓨터를 이용해서 에어백 접기패턴을 구해야합니다. 그랬더니 우리가 개발했던 곤충 접기패턴 알고리즘을 에어백 시뮬레이션에 적용할 수 있단 걸 발견했습니다. 그래서 이렇게 시뮬레이션이 가능하죠. 접히는 부분들이 보이십니까? 이제 이렇게 에어백을 펼치면 에어백 작동여부를 확인할 수 있습니다. 정말 재밌는 것은 여기서부터 입니다.
You know, where did these things come from? Well, the heart stent came from that little blow-up box that you might have learned in elementary school. It's the same pattern, called the water bomb base. The airbag-flattening algorithm came from all the developments of circle packing and the mathematical theory that was really developed just to create insects -- things with legs. The thing is, that this often happens in math and science. When you get math involved, problems that you solve for aesthetic value only, or to create something beautiful, turn around and turn out to have an application in the real world. And as weird and surprising as it may sound, origami may someday even save a life. Thanks.
이게 다 어디서 나오는 걸까요? 심장 스텐트는 우리가 초등학교 때 배웠을 법한 풍선/공 접기패턴에서 비롯되었습니다. 물풍선 베이스와 같은 접기패턴이죠. 에어백 접기 알고리즘을 개발하는데 쓰였던 원 채우기와 수학 이론은 사실 다리가 있는 곤충 접기패턴을 만들기 위해 연구했던 이론들입니다. 이런 예는 수학 과학 분야에 자주 발생하는 일입니다. 문제에 수학 이론을 적용시키게 되면 단지 예술적 가치를 지닌 물건을 창조하기 위해 쓰인 것들이 의외로 실제 세상에서도 유용하게 적용시킬 곳이 있습니다. 놀랍고 이상하게 들릴지도 모르겠지만 종이접기가 생명을 구할 날이 올지도 모릅니다. 감사합니다.
(Applause)
(박수)